Box Of Synths manualDesigning sounds
The chat and the composer
How to write a request, choose Generate or Edit, attach context, pick a source and read what the app says back.
The chat is where you tell Box Of Synths what you want. You type a description of a sound, press Return, and the app designs it. Then you keep talking to the same sound: Edit changes it, and Generate starts a new one. This page covers the chat block, the keys in it, and what you see while a design runs, fails or comes back as words.
The chat block
The chat block sits above the keyboard in the main column. It has a heading, a box for your words and one row of keys.
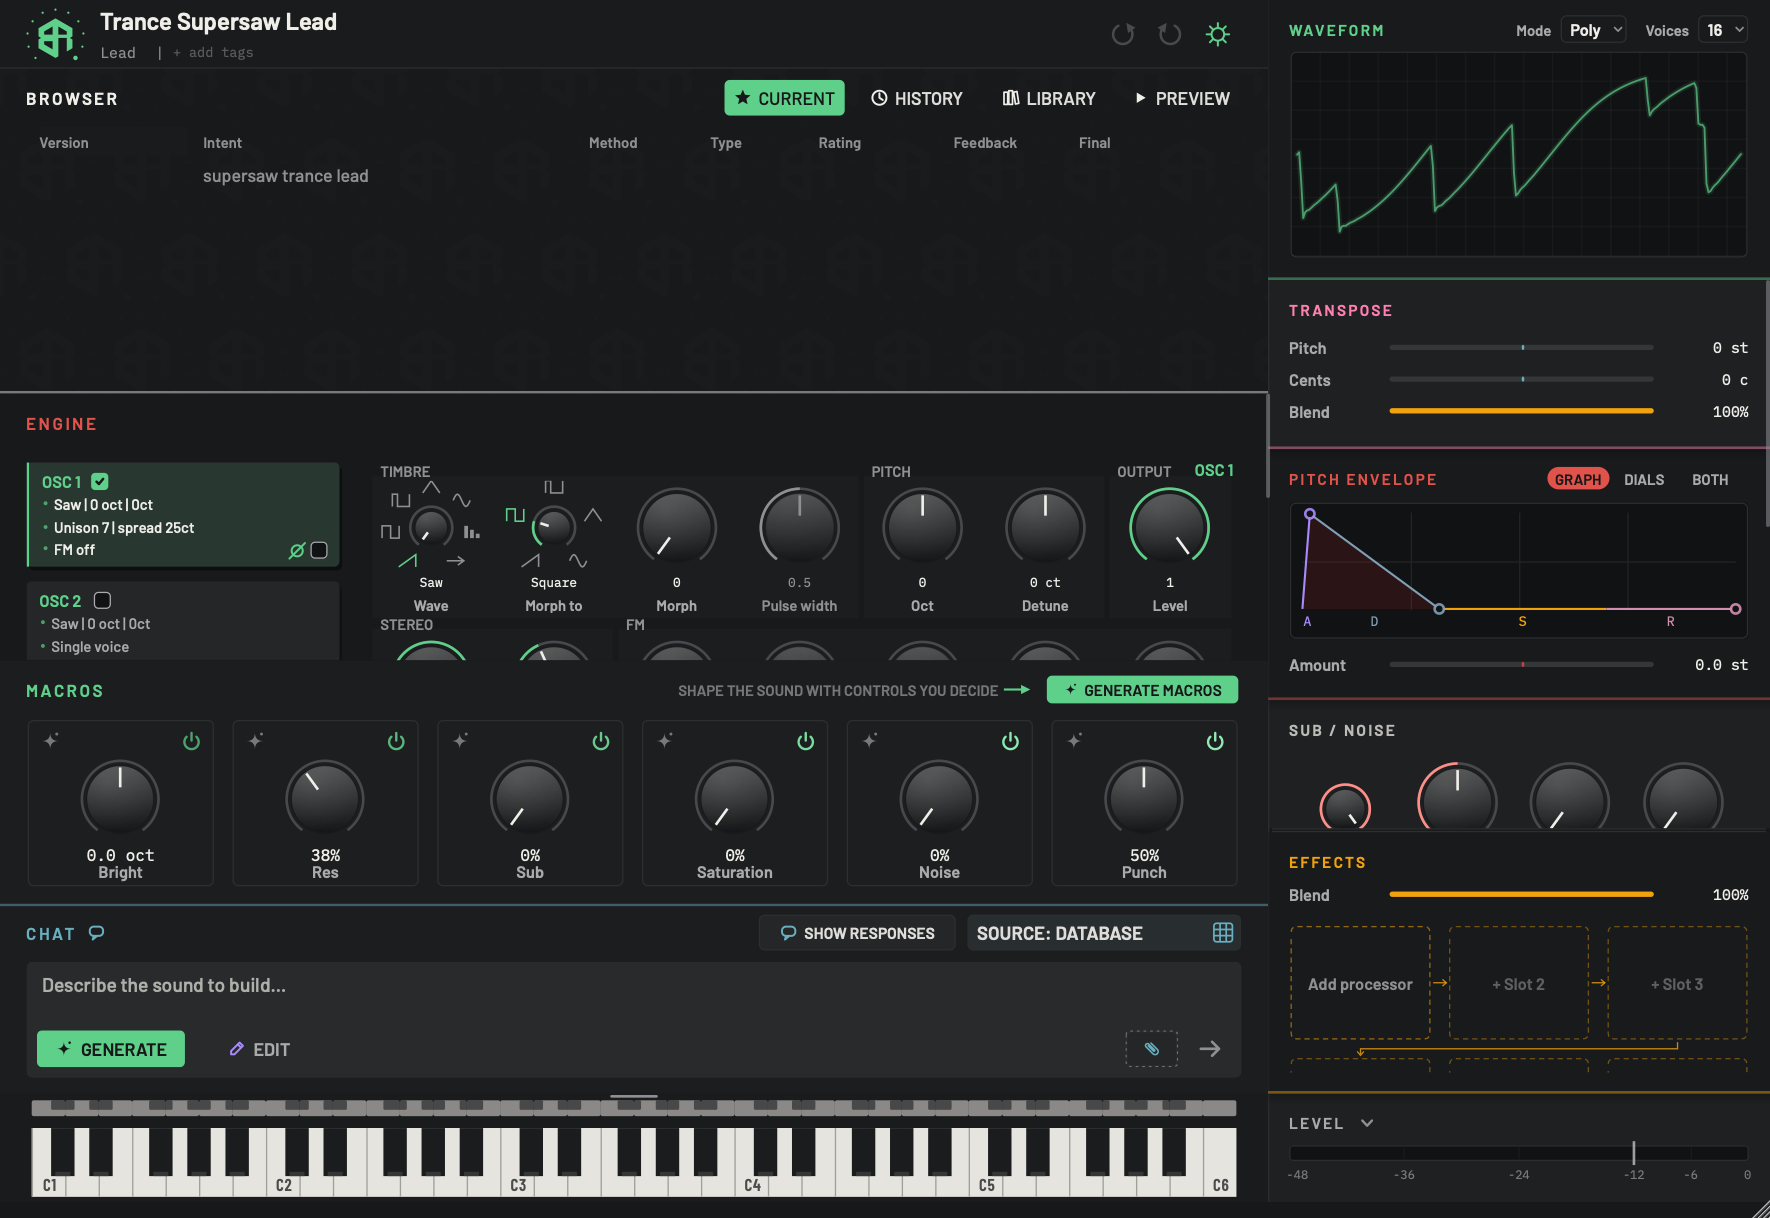
The chat block sits between the macros and the keyboard. Drag its top edge up or down to make the description box taller. It holds the words you type and the keys that send them.
-
1Chat top edgeArea
The line along the top of the block. Drag it up or down to make the chat taller or shorter. It will not go shorter than the words in the box need. The height is remembered.
-
2Chat headingDisplay
The title of the block. The Show responses key and the Source control sit at the right end of the same line.
-
3Show responsesSwitch
A key with a speech glyph. Click it to turn it on, and it lights. Click again to turn it off. When it is on, the designer's full written reply to each design is kept with the chat.
The reply does not appear in the Browser table, and the key does nothing when the source is Database.
- Starts as
- Off
The setting is remembered between sessions.
-
4SourceMenu
Says who designs your sounds and opens a menu to change it. Click it and pick a row. The change applies at once. The glyph at the right tells you which kind is active: a grid for the database, a coin for tokens, a spark for an AI service or a local model app.
The key reads SOURCE: and then the name of the source you have set up.
- Options
The menu lists eight rows, in order:
- Database: selects Built-in database.
- Tokens: selects Box Of Synths, paid with tokens.
- Claude: selects My own AI key with Claude as the AI service.
- OpenAI: selects My own AI key with OpenAI.
- OpenRouter: selects My own AI key with OpenRouter.
- Ollama: selects Local model with Ollama.
- LM Studio: selects Local model with LM Studio.
- Custom: selects My own AI key with Custom.
A tick marks the one in use.
- Starts as
- Database
Hovering shows a tip that ends with the words about designer settings. That wording is old: clicking opens this menu, not Settings. Full explanation on Sources, tokens and what a design costs.
-
5Description boxText box
Type what you want here. It starts as one line and grows as you type, up to five lines, then scrolls. Click anywhere on the card to put the cursor in the box. Press
Returnto send, orShiftandReturntogether to start a new line.With Generate lit, the grey words read Describe the sound to build…. With Edit lit they read What needs improving.
- Starts as
- Empty
-
6Generate or EditSwitch
Chooses what your words do. Generate (green) makes a new sound. Edit (violet) changes the sound you have. The lit one is the one the send arrow and
Returnuse.- Options
Generate: a new sound from your words.
Edit: a change to the sound on the synth.
- Starts as
- Generate
Edit is greyed out until a sound has been designed in this chat. It is also greyed while a design is running.
-
7Paperclip (context)Menu
Attaches extra context to your next request: a file, or an earlier version of this sound. Click it to open its menu. You can also drop one file straight onto it. Once something is attached, the key shows a count instead of the plain paperclip.
The menu holds Add PDF or text file..., Reference a version (only when this chat has versions) and one Remove line for each thing attached.
- Options
Up to 8 pieces of context. Files:
.pdf,.txt,.mdor.json, up to 5 MiB.
Context is for Tokens, your own AI key or a local model. It cannot be used with the built-in database.
-
8Send arrowKey
Sends your words in the lit mode, the same as
Return. It is grey until there are words to send and while a design is running.Its tip reads Submit this action.
Writing a request
Click anywhere on the card to put the cursor in the box. The box starts as one line and grows as you type, up to five lines, and then scrolls.
- Press
Returnto send. - Press
ShiftandReturntogether to start a new line. - The send arrow does the same as
Return. It is grey until there are words to send. - The arrow keys do not bring back earlier requests. Your earlier requests are in the Browser: the Current tab shows every request for this sound, and the History tab lists your earlier chats.
Nothing is sent until you press Return or the arrow. While a design is running, the box cannot be used.
You can make the chat taller by dragging the line along its top edge. It will not go shorter than the words in the box need, and your height is remembered.
Asking about one part
Two other parts of the screen put a hint in the box. If you start a change from a macro card, or press Generate macros, the box is empty under a hint and your words apply to the macros only. If you choose Generate from an effect slot, the grey words read Describe the effects to add… and the next send changes only the effects. To drop that hint without sending, press Esc or click on empty space away from the chat box. See Macros and Effects.
Generate or Edit
The switch at the left of the key row chooses what your words do.
| Generate | Edit | |
|---|---|---|
| What it does | Makes a new sound from your words. | Changes the sound on the synth. |
| The sound you had | Goes into your chats under History. | Stays, and the change is added as a new version. |
| Grey words in the box | Describe the sound to build… | What needs improving |
| Colour | Green | Violet |
| When it is available | Always, except while a granular sound is on the synth. | After a sound has been designed in this chat. |
Choosing Generate over a sound that is already there starts a fresh synth and a fresh chat, then designs. Your old sound is kept under History, and the undo key can bring it back. The first design in a chat switches the switch to Edit by itself.
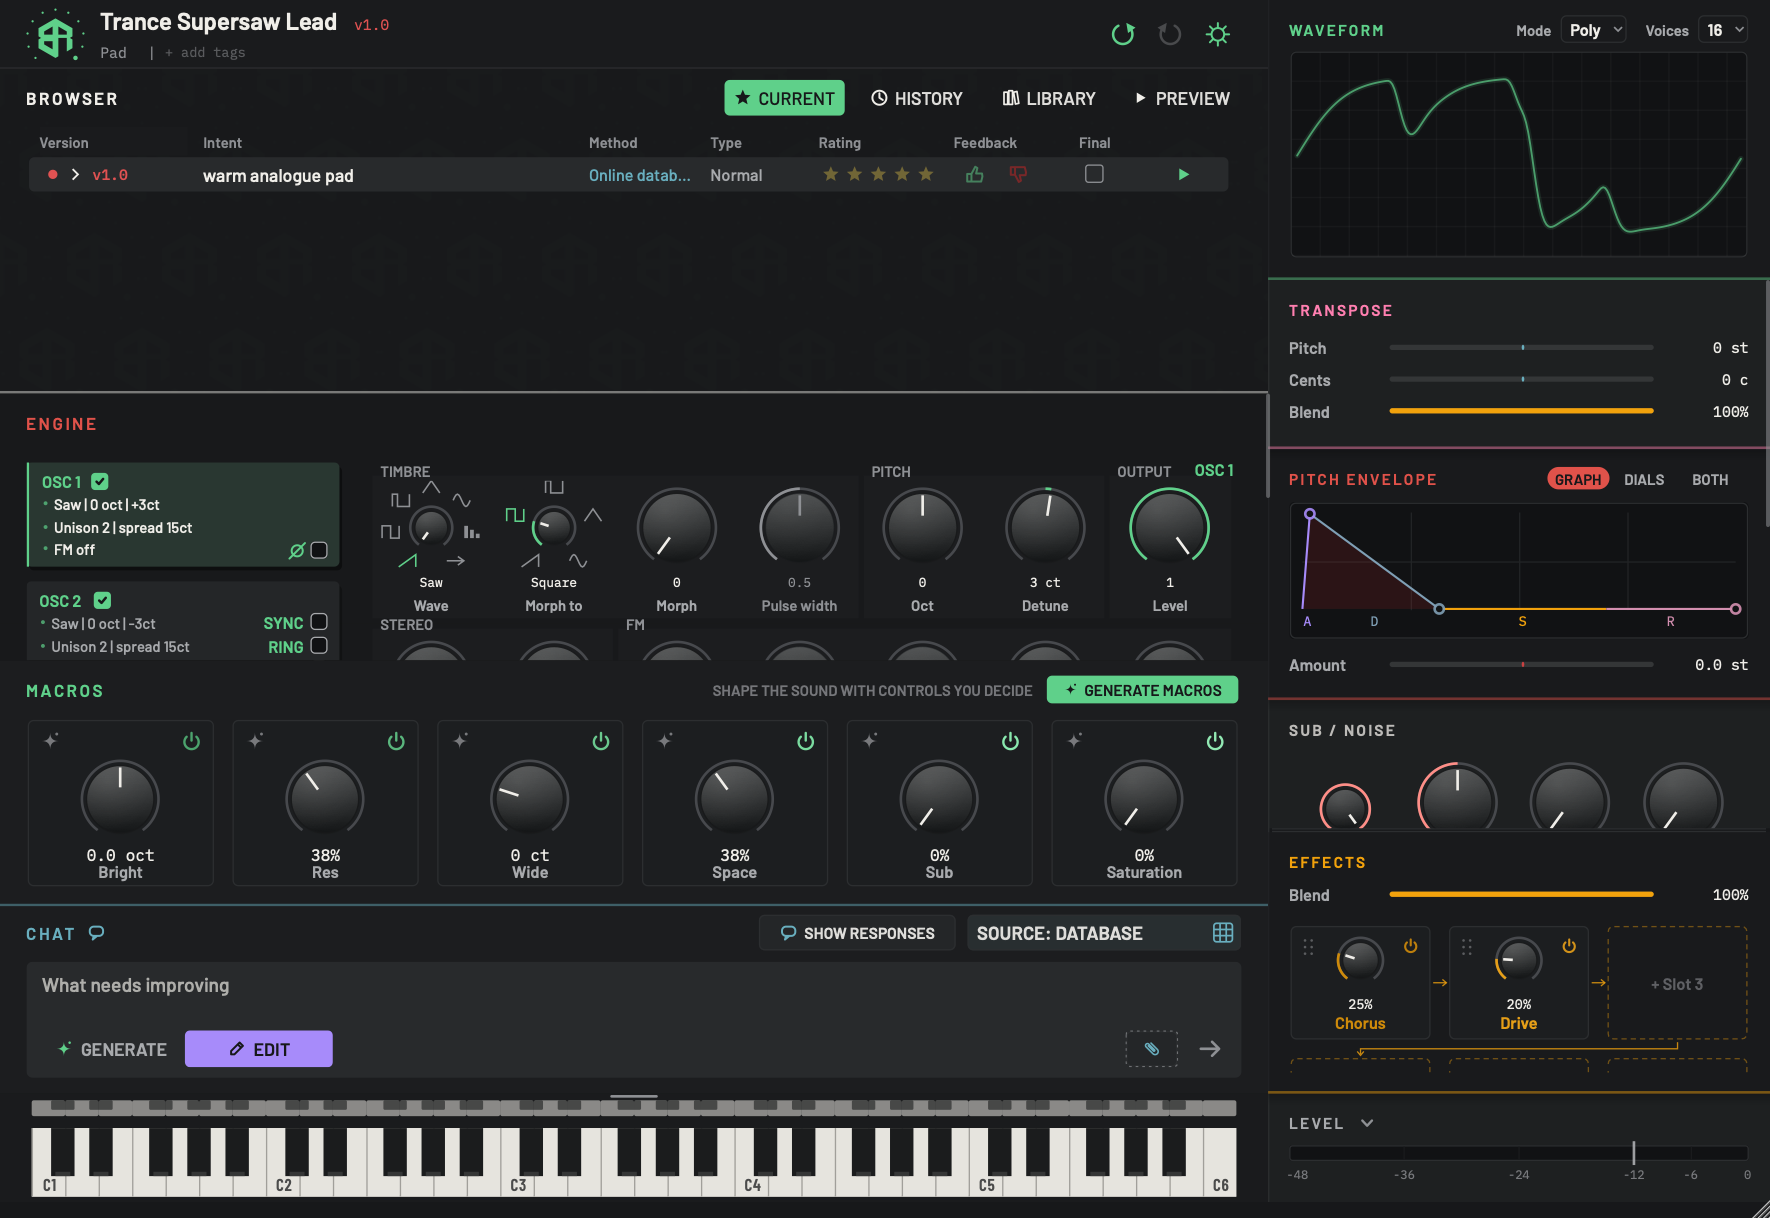
Once a sound has been designed, the chat switches itself to Edit. This picture shows what changed on the screen after the first design landed.
-
1Version labelDisplay
The version of the sound on the synth. A new design counts up the main number:
v1.0, thenv2.0. Small changes you make by hand sit under a design with a longer number, such asv1.1.0. -
2Undo keyKey
Lights up once there is something to undo. Click it, or press
Cmd+Z(Ctrl+Zon Windows), to go back one step, including back to the sound you had before a design. See The header.In a text box such as the description box, the same keys undo your typing instead.
-
3Version rowTable
The first version of the new sound. It shows the words you typed, how it was made, a star rating, thumbs, a Final box and a play key. Click the row to load that version again. See Browser: Current.
In this picture the Method column reads Online datab..., which means the online database made it.
-
4Macros for the new soundArea
A design also builds a fresh set of macros to suit the sound. Compare these with the macros before the design on The screen at a glance. See Macros.
-
5Effects for the new soundArea
The designer filled the first two effect slots here, with a chorus and a drive. See Effects.
-
6SourceMenu
Unchanged. It still says who designs your sounds. Full details in The chat and the composer.
-
7Description box in EditText box
The grey words now read What needs improving. Type what to change about the sound that is on the synth, such as darker, and press
Return. With the cursor in this box, the dials your words may move light up. Dials you have locked stay as they are.- Starts as
- Empty
-
8Generate or EditSwitch
Edit is now lit in violet, and Generate is dim. Click Generate if you want a new sound instead. A new sound replaces the one on the synth, and the old one is kept for you under History.
- Options
Generate: a new sound.
Edit: a change to this sound.
- Starts as
- Edit after a design lands
-
9Paperclip (context)Menu
Unchanged. See The chat and the composer. Now that this chat has a version, the menu also offers Reference a version.
-
10Send arrowKey
Unchanged. It sends your words as an edit while Edit is lit.
Edit is greyed out until a sound has been designed in the chat in front of you. Hover for Nothing to edit yet: generate a sound first. Both keys are greyed while a design is running. When a granular sound is on the synth, Generate is greyed and only Edit works. To make a different sound, start a new one: see Starting a new sound.
Hover over the two keys to read what each does. Generate says Make a new synth from what you type. The one on the rack goes to CHATS. Edit says Change the synth that is there. With the cursor in the field, the dials it may move light up; locked ones stay put.
With Edit lit and the cursor in the box, the dials your words may move light up. Dials you have locked stay as they are. See How dials, sliders and keys behave.
Words that the built-in database understands
The built-in database reads short plain words as changes to the sound that is there.
- Words about the sound, such as louder, darker, fatter, brighter, wider, punchier, softer, less glide, more reverb, an octave up or make it mono, move the sound that is there. Saying fatter twice makes it fatter again.
- Typing words that mean undo, such as undo or go back, in Edit acts like the undo key.
Randomise by word
Type the word random and the app asks Randomise this sound? before designing anything. The card says This throws every dial in the ticked parts. The sound you have now stays in the history. Two tick boxes, Synthesis and Effects, choose which parts move. Press Randomise to throw them. It is instant and costs nothing on any source. With a source other than the database the card also offers Ask the designer instead, which sends your words as a normal request and uses the source's cost.
While a design runs
When you send a request, a dark sheet covers the whole window. Nothing under it can be used until it closes.
- The heading reads Designing your sound... for a new sound or Updating your sound... for an edit.
- YOUR REQUEST shows your words.
- A moving line shows the app is working, and a count under it reads Waiting for response and the seconds so far. When the answer starts to arrive, the count reads Received and a number of characters.
- With a local model you may see a longer wait while the model starts up.
- With your own AI key, a new sound may first arrive from the built-in database, and the sheet reads Database version ready. Your AI is still designing. Your service's version follows.
To stop, click CANCEL on the sheet, or press Esc. The request is cancelled and the window comes back. With Edit, your sound is left as it was. With Generate, the sound you had was already sent to History when you pressed it, and the synth holds a fresh plain one.
When the sound arrives, the sheet closes, the sound loads onto the synth and a new row appears in the Browser.
A new sound may instead arrive as several takes to choose from. A sheet called Choose a take opens, and nothing lands on the synth until you pick one. See Takes. It never happens with Edit.
When a design fails
If a design cannot be completed, the sheet changes. Its heading reads Design could not be completed, the reason shows in red under it, and a BACK key appears. Your words go back into the box so you can send them again. With Edit, your sound has not changed. With Generate, the sound you had is in History. While this sheet is up, only BACK works, and Esc does nothing. Click BACK to return.
The default reason is The design failed. Your patch has not changed. The other reasons depend on the source:
| Source | What the sheet can say |
|---|---|
| Tokens | Sign in to design on your tokens. Your patch has not changed. |
| Tokens | Cannot connect to the token service. Nothing was charged. |
| Tokens | Box of Synths is unavailable. Your patch has not changed. |
| Tokens | The site did not answer in time. Send the same words again: a sound that was already made comes back without a second token. |
| Tokens | The connection ended before the result was confirmed. Check your account before retrying. |
| Tokens, no tokens left | No tokens left. The TOP UP key appears beside your words. See Sources, tokens and what a design costs. |
| Your own AI key | The model did not return a usable patch. It said: followed by the start of what came back. |
| Your own AI key | The provider did not answer. |
| Your own AI key | A plain-words reason from your service, such as that it did not accept the key, ending Your sound has not changed. |
When the app answers with words
Sometimes the app answers in words and does not make a sound. After Edit, your sound is left alone. After Generate, the sound you had is in History. The same sheet shows the answer in plain text, with no red and no heading, and a BACK key. Your words stay in the box. This happens with the built-in database in these cases:
- You asked for a beat or a loop. The app says I make one playable sound at a time, not a beat or a loop. Ask for a single hit (a kick, a snare, a clap) or for the bass, lead or pad of that style, and the pattern is yours to play. Your sound is unchanged.
- You asked it to write a melody or chords. It says it designs the sound and the notes are yours to play, and that your sound is unchanged.
- You asked a question. It says what to type, in a sentence or two, and ends Your sound is unchanged.
- You pressed Edit with words it could not read. It says I kept your sound: I could not tell how to change it from those words. and suggests words to try, such as brighter, darker, fatter, wider, punchier, softer or more reverb. If you meant a new sound, choose Generate.
Attaching context
Context is extra material that goes along with your next request. It can be a file, or an earlier version of this sound. Click the paperclip to open the menu.
| Menu line | What it does |
|---|---|
| Add PDF or text file... | Opens a file chooser. Pick a .pdf, .txt, .md or .json file. |
| Reference a version | A submenu of this sound's versions, such as v1.0 and v2.0. Picking one sends that version's settings and the words that asked for it, as reference. Shown only when the chat has versions. |
| Remove and the name | One line for each thing attached. Click to take it off. |
The file chooser is headed Add context (PDF or text, up to 5 MiB). You can also drop one .pdf, .txt, .md or .json file straight onto the paperclip. It shows a dashed outline while you drag. Once something is attached, the paperclip shows a count. Hover over it to read Drop one PDF or text file here, or click to add a version or file reference. Each added context costs one hosted token only. BYOK file contexts have no platform surcharge.
Limits. You can attach up to 8 pieces of context. A file can be up to 5 MiB and 12,000 characters of text. A PDF must have text the app can read, so scanned or locked PDFs will not work, and reading a PDF needs a PDF text tool on your computer. A version reference can be up to 40,000 characters. All your context together can be up to 60,000 characters. If something cannot be added, the count does not change.
Which sources take context. Context works with Tokens, your own AI key and a local model. The built-in database cannot use it, and a request with context sent on the database does nothing until you change the source or remove the context.
What it costs. On Tokens, each piece of context costs 1 token, on top of the cost of the request. The coin on Generate and Edit adds it up for you. On your own AI key, we add nothing, and your provider bills what it bills. A local model is free. See Sources, tokens and what a design costs.
Context is an extra file, or an earlier version of your sound, that goes along with your next request. It needs the Tokens source, your own AI key or a local model.
-
1Pick a source that takes context
Click Source and choose Tokens or an AI service or local model you have set up. The built-in database cannot take context.
-
2Open the paperclip menu
Click the paperclip. The menu offers Add PDF or text file..., and Reference a version if this chat has versions.
-
3Choose what to attach
Pick a file of type
.pdf,.txt,.mdor.jsonup to 5 MiB, or pick a version. The paperclip now shows a count of what is attached. -
4Check the cost
On Tokens, each piece of context adds 1 to the number on the coin. Open the paperclip menu again and choose a Remove line to take one off.
-
5Send
Describe the sound as usual and press
Return. The context goes along with this request.
Choosing a source
The Source control at the top right of the chat block says who designs your sounds. Click it and pick a row. The change applies at once.
The menu lists eight rows, in this order. Each one selects a source you set up under Settings, on the Designer tab.
| Row | Selects |
|---|---|
| Database | Built-in database. Free. |
| Tokens | Box Of Synths, our hosted designer, paid with tokens. |
| Claude | My own AI key, with Claude in the AI service list. |
| OpenAI | My own AI key, with OpenAI in the AI service list. |
| OpenRouter | My own AI key, with OpenRouter in the AI service list. |
| Ollama | Local model, with Ollama in the Local model list. |
| LM Studio | Local model, with LM Studio in the Local model list. |
| Custom | My own AI key, with Custom in the AI service list. |
A tick marks the one in use. The glyph at the right of each row tells you the kind: a grid for the database, a coin for tokens and a spark for any other service. After you pick a row, the key reads SOURCE: and the name in capitals, such as SOURCE: LM STUDIO.
- Pick Tokens with no account and a sign-in page opens in your browser.
- Pick a service you have not set up and nothing seems to change, but your next design will probably fail. For Claude, OpenAI, OpenRouter and Custom with no key saved, the status line under the chat says Add your and the service's name, then key in settings (the cog) and this method is live. Set the service up first under Settings, on the Designer tab. See Settings: Designer and Settings: Designer, source by source.
- Agent is not in this menu, and is not a source you can choose in this release. See Settings: Designer, source by source.
Hovering the key shows a tip that ends with words about designer settings. That wording is old, and clicking opens this menu. For a local model app the tip still says "key", though a local model needs none. The tip reads one of these:
| Source | Tip |
|---|---|
| Tokens, signed in | Designing on your tokens: our designer with the database behind it. Each typed action costs 1 token, plus 1 per added context. Click for the designer settings. |
| Tokens, not signed in | Designing from the free database. Sign in and the same requests run on your tokens. Click for the designer settings. |
| Database | Designing from the Box Of Rules database. A site API key is required. Click for connection settings. |
| Claude | Designing with your own Anthropic key. Click for the designer settings. |
| OpenAI | Designing with your own OpenAI key. Click for the designer settings. |
| OpenRouter | Designing with your own OpenRouter key. Click for the designer settings. |
| Ollama | Designing with your own Ollama (local) key. Click for the designer settings. |
| LM Studio | Designing with your own LM Studio (local) key. Click for the designer settings. |
| Custom | Designing with your own Custom (OpenAI-compatible) key. Click for the designer settings. |
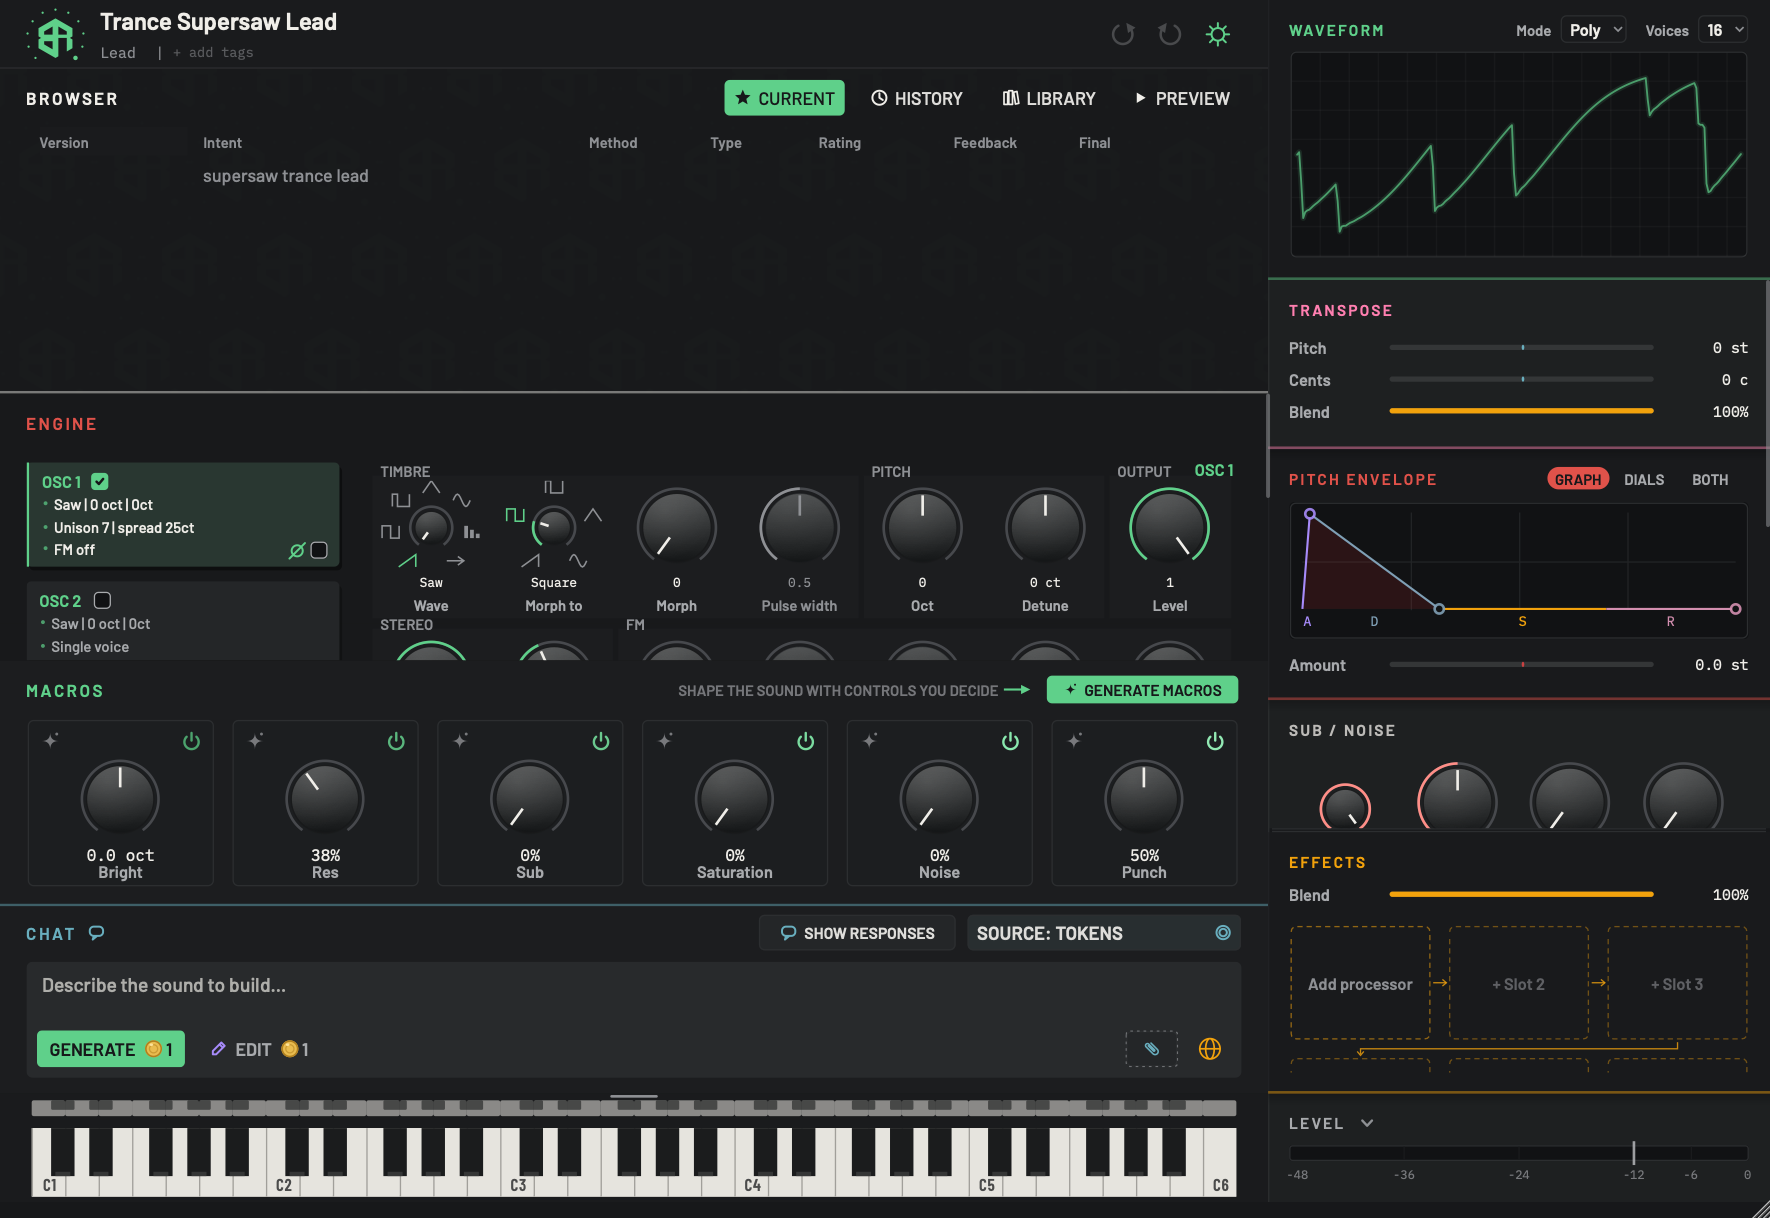
When the source is Tokens, each action costs tokens, and the keys show the cost before you press them. See Sources, tokens and what a design costs.
-
1Request with no versionTable
A request that produced no sound has a row of its own in the Browser. It shows your words, dimmed, with no version, stars, thumbs or play key. It cannot be loaded. See Browser: Current.
-
2Show responsesSwitch
Unchanged. See The chat and the composer.
-
3Source: TokensMenu
Reads SOURCE: TOKENS, with a coin glyph at the right. Your requests go to our hosted designer and use tokens from your Box Of Synths account. Click it to pick another source.
The first time you use Tokens, a card called DESIGNING ON TOKENS asks you to agree. See Sources, tokens and what a design costs and Agreements and confirmations.
-
4Description boxText box
Works as it does with any source. See The chat and the composer.
-
5Generate with its costKey
A gold coin and a number sit on the key. The number is what a new sound will cost in tokens: 1, plus 1 for each piece of context attached.
- Options
1 token, plus 1 for each piece of context.
With any other source there is no coin.
-
6Edit with its costKey
The same coin and number on Edit. An edit costs the same as a new sound: 1 token, plus 1 for each piece of context.
- Options
1 token, plus 1 for each piece of context.
-
7Paperclip (context)Menu
Each piece of context you attach adds 1 to the cost shown on Generate and Edit, and the key shows how many you have attached. See The chat and the composer.
-
8Send arrow showing a globeKey
The arrow turns into a globe when the app cannot reach the token service. Click it to check the connection again. Nothing is sent and no token is used.
Hovering shows Cannot connect to the token service. Click to check again; nothing is submitted. The arrow returns once the service answers.
On Tokens, a gold coin and a number appear on Generate and Edit. The number is what the next request costs: 1 token, plus 1 for each piece of context. With any other source there is no coin. The send arrow turns into a globe if the app cannot reach the token service. Click it to check again. Nothing is sent and no token is used.
The first time you use tokens, a card asks you to agree to how tokens work. Read it on Sources, tokens and what a design costs.
Change who designs your sounds from the chat, and see what the first design on tokens looks like.
-
1Open the Source menu
Click Source at the top right of the chat. A short menu opens with a tick on the source in use.
-
2Pick Tokens
Click Tokens. The control now reads SOURCE: TOKENS. If you have no account yet, a sign-in page opens in your browser. Sign in there, then return to the app.
-
3Read the cost
A gold coin and a number now sit on Generate and Edit. That number is what the next request will cost.
-
4Send your first request
Type a description and press
Return. The first time, a card called DESIGNING ON TOKENS appears first. Read the cost in the first paragraph. -
5Accept or step back
Click Accept to send the request. Click Not now to close the card without sending. You can pick Database from the Source menu at any time to design for nothing.
Show responses
The Show responses key beside Source is a switch. When it is on, it lights, and the designer's full written reply to each design is kept with the chat. It does nothing with the built-in database, and the reply does not show in the Browser table. The setting is remembered. Hover over the key to read Show the model's whole reply in the chat, as it came back. If you fold the chat block by clicking its title, Show responses and Source stay on the title line.
Keys that work in the chat
| Key | What it does |
|---|---|
Return |
Sends your words in the lit mode. |
Shift and Return |
Starts a new line. |
Esc |
While a design is running, cancels it. On the start screen, leaves it. Otherwise it closes whatever is open on top, such as Settings or Preview. It does not clear your words or hand back the keyboard. |
Cmd+Return (Ctrl+Return on Windows) |
When the cursor is outside the box: opens History and puts the cursor in its search box. It does not send a design. Inside the box, Return with these keys held still sends. |
Cmd+Z (Ctrl+Z) |
In the box, undoes your typing. Anywhere else, undoes the last change to the sound. |
Space |
In the box, types a space. Anywhere else, plays or stops the preview. |
Cmd+K (Ctrl+K) |
Opens or closes the keyboard. |
The everyday loop in the chat: describe a sound with Generate, then keep improving it with Edit.
-
1Write what you want
Click the description box and type a few words about the sound. Press
ShiftandReturntogether if you want a new line. The box grows up to five lines. -
2Choose Generate
Click Generate so that it is lit green. A new sound replaces the one on the synth, and the old one is kept under History.
-
3Send it
Press
Returnor click the send arrow. A dark sheet covers the window with your words and a CANCEL key. Wait for it to close. -
4Switch to Edit
After the sound lands, Edit lights in violet by itself. If you picked Generate again, click Edit to change the sound instead of replacing it.
-
5Say what to change
Type what needs improving, such as brighter or more reverb, and press
Return. The new version appears as a new row in the Browser.