
Box Of Synths manualThe synth
Effects
Add, order, switch off and remove effects, open an effect's detail panel, and every effect with its controls, ranges and starting values.
The Effects block is the chain of processors the sound passes through after the oscillators and the filter. It sits near the foot of the right-hand column. Each effect is a tile. The sound goes through the tiles in order, and you can add, move, switch off and remove them.
The block
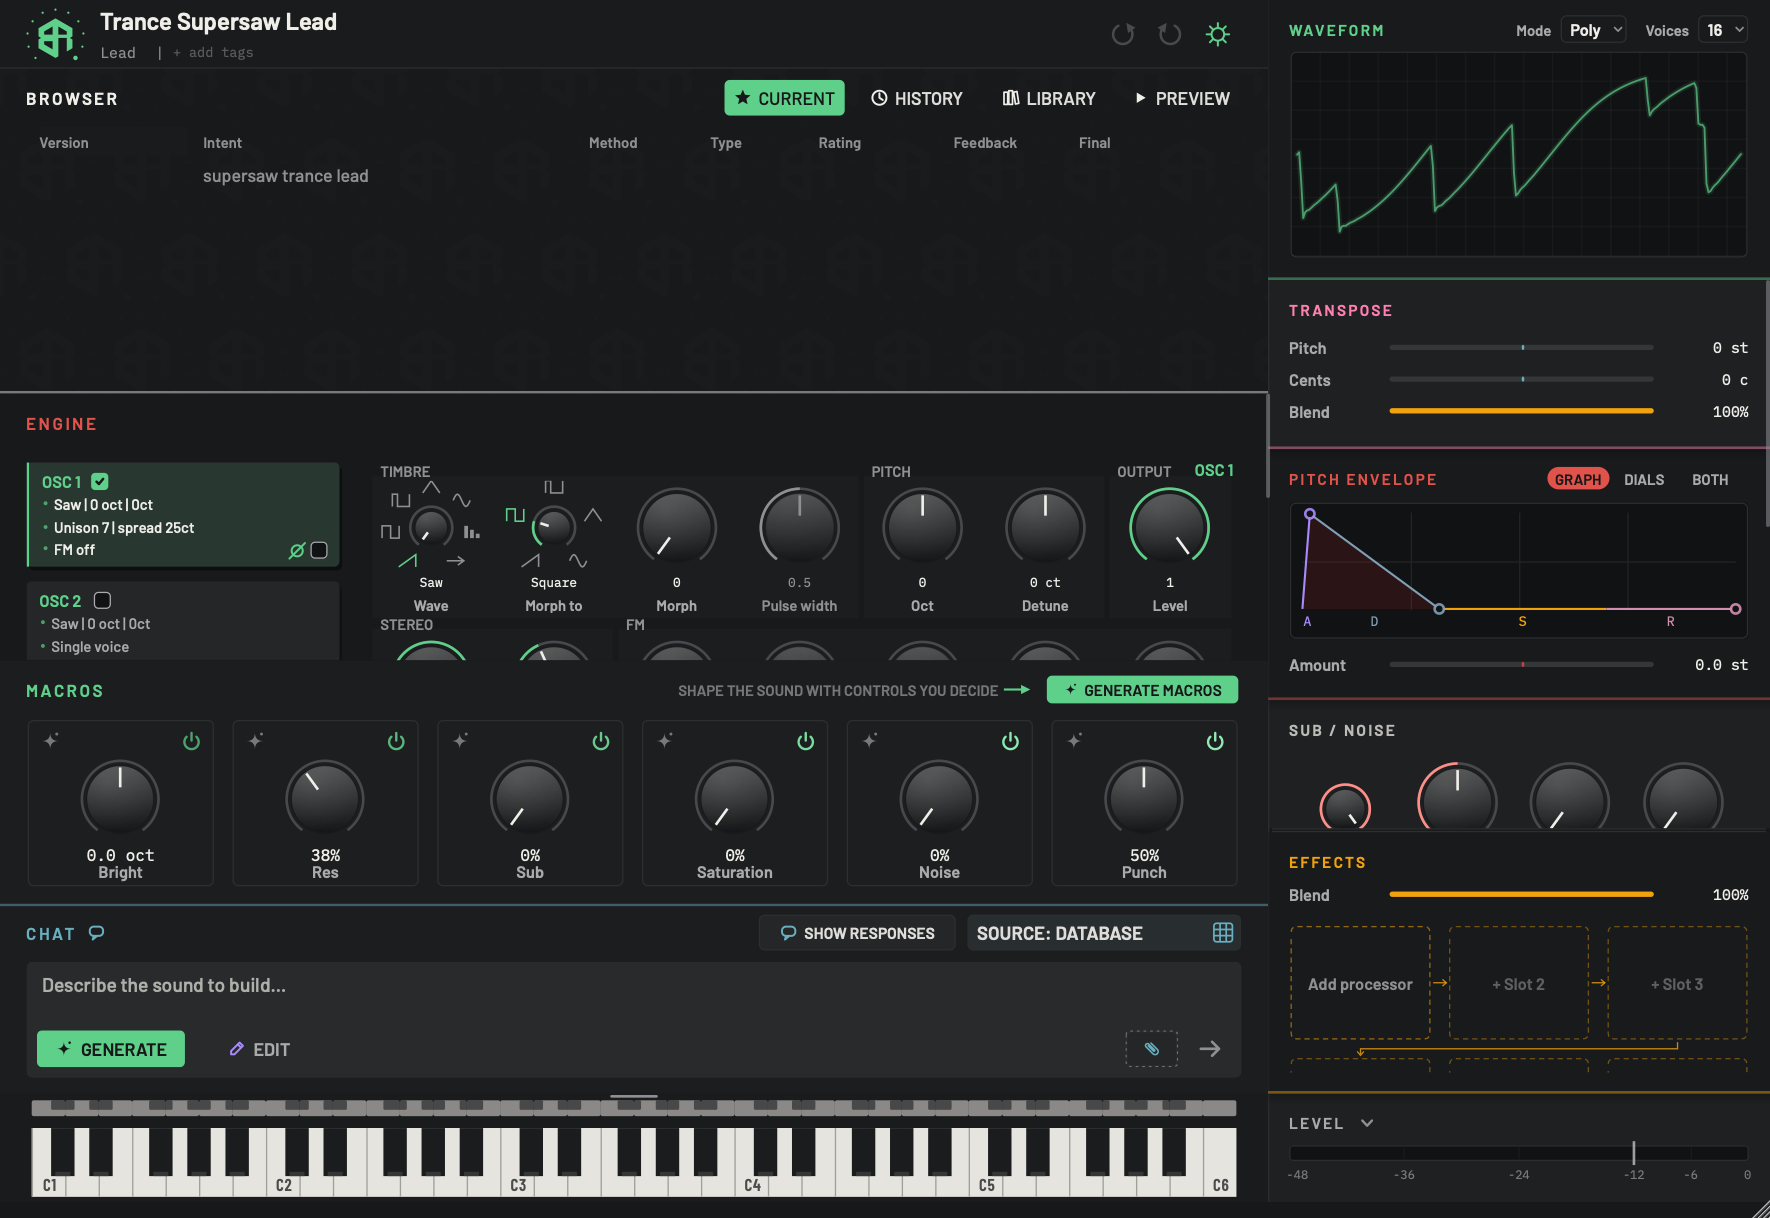
-
1Effects titleKey
Click the title to fold the block. Folded, the number of effects on the sound shows at the right of the title. The Blend slider stays in view.
Drag the bottom edge of the block up or down to change its height. The grid scrolls with the mouse wheel when it holds more rows than fit.
-
2BlendSlider
Mixes the effects with the plain synth. At the left you hear only the plain synth. At the right you hear the whole chain of effects. In between you hear both. It applies to all the effects together.
- Options
0 to 100%.
- Starts as
- 100%
Hover for the tip How much of the effects you hear: left is the plain synth, right is the whole chain. Until a sound exists the slider is greyed out and says Generate a sound first.
-
3Add processorKey
An empty slot. Click it to open the add menu and choose an effect for this slot. While the block has no effects, the words Add processor show on the first empty slot. They show on any empty slot while the pointer is over it.
The menu is described on the Effects page.
-
4Empty slot 2Key
Another empty slot, drawn dashed and numbered, for example + Slot 2. Click it to add an effect here. An effect added from a slot's menu takes that slot.
-
5Empty slot 3Key
The third slot in the first row. The grid is three slots across.
-
6Signal path arrowsDisplay
The small arrows between slots show the way the sound travels. It runs left to right along a row, then a bent arrow carries it from the end of one row to the start of the next. The arrows are fixed in place: they are drawn between every pair of slots, whether the slots are empty or full.
-
7Next row of slotsArea
The top of the second row, partly out of view. The grid starts with six slots, and three more slots are added each time the grid fills up.
The Blend slider is always in view, even when the block is folded. It mixes the whole chain with the plain synth. At 0% you hear only the plain synth. At 100% you hear the whole chain. It starts at 100%.
Below it is a grid of slots, three across. A new sound starts with six slots, and three more are added each time the grid fills. An empty slot is dashed and numbered, for example + Slot 2. While the block has no effects, the first empty slot says Add processor. Any empty slot says it while the pointer is over it.
Click the Effects title to fold the block. Folded, it shows how many effects the sound has. Drag the bottom edge of the block to change its height, and use the mouse wheel to scroll when there are more rows than fit.
Add an effect
- Click an empty slot.
- Choose an effect from the menu. It takes the slot you clicked, and it is switched on.
The menu lists every effect that is not already in the chain, in this order: Fuzz, Drive, Octaver, Flange, Phaser, Pre-amp, Bit crush, Formant, Compressor, Chorus, Delay, Reverb, Analogue, Ott and Fold. Each effect can be in the chain once, so there are at most fifteen tiles. When all fifteen are in, the menu says Everything is on the row already.
Under a line, the menu also has Generate... It lets you describe one new effect in your own words, using the chat, and the designer builds it for the next free slot.
Put an effect in an empty slot, turn its dial, and hear it.
-
1Click an empty slot
Click Add processor. A menu lists every effect that is not already on the sound.
-
2Choose an effect
Click a name in the menu, for example Fuzz. It appears in that slot, switched on.
-
3Turn the dial
Drag the dial on the new tile. The value under it changes and you hear the effect.
-
4Balance it against the plain sound
Drag Blend to the left to bring the plain synth back in. At the right you hear only the effects.
The last line of the add menu, sOURnd effects..., opens a sheet of extra effects from sOURnd, our sister brand. They need you to be signed in to an account with access, and they run after the effects on this page. See sOURnd effects.
An effect tile
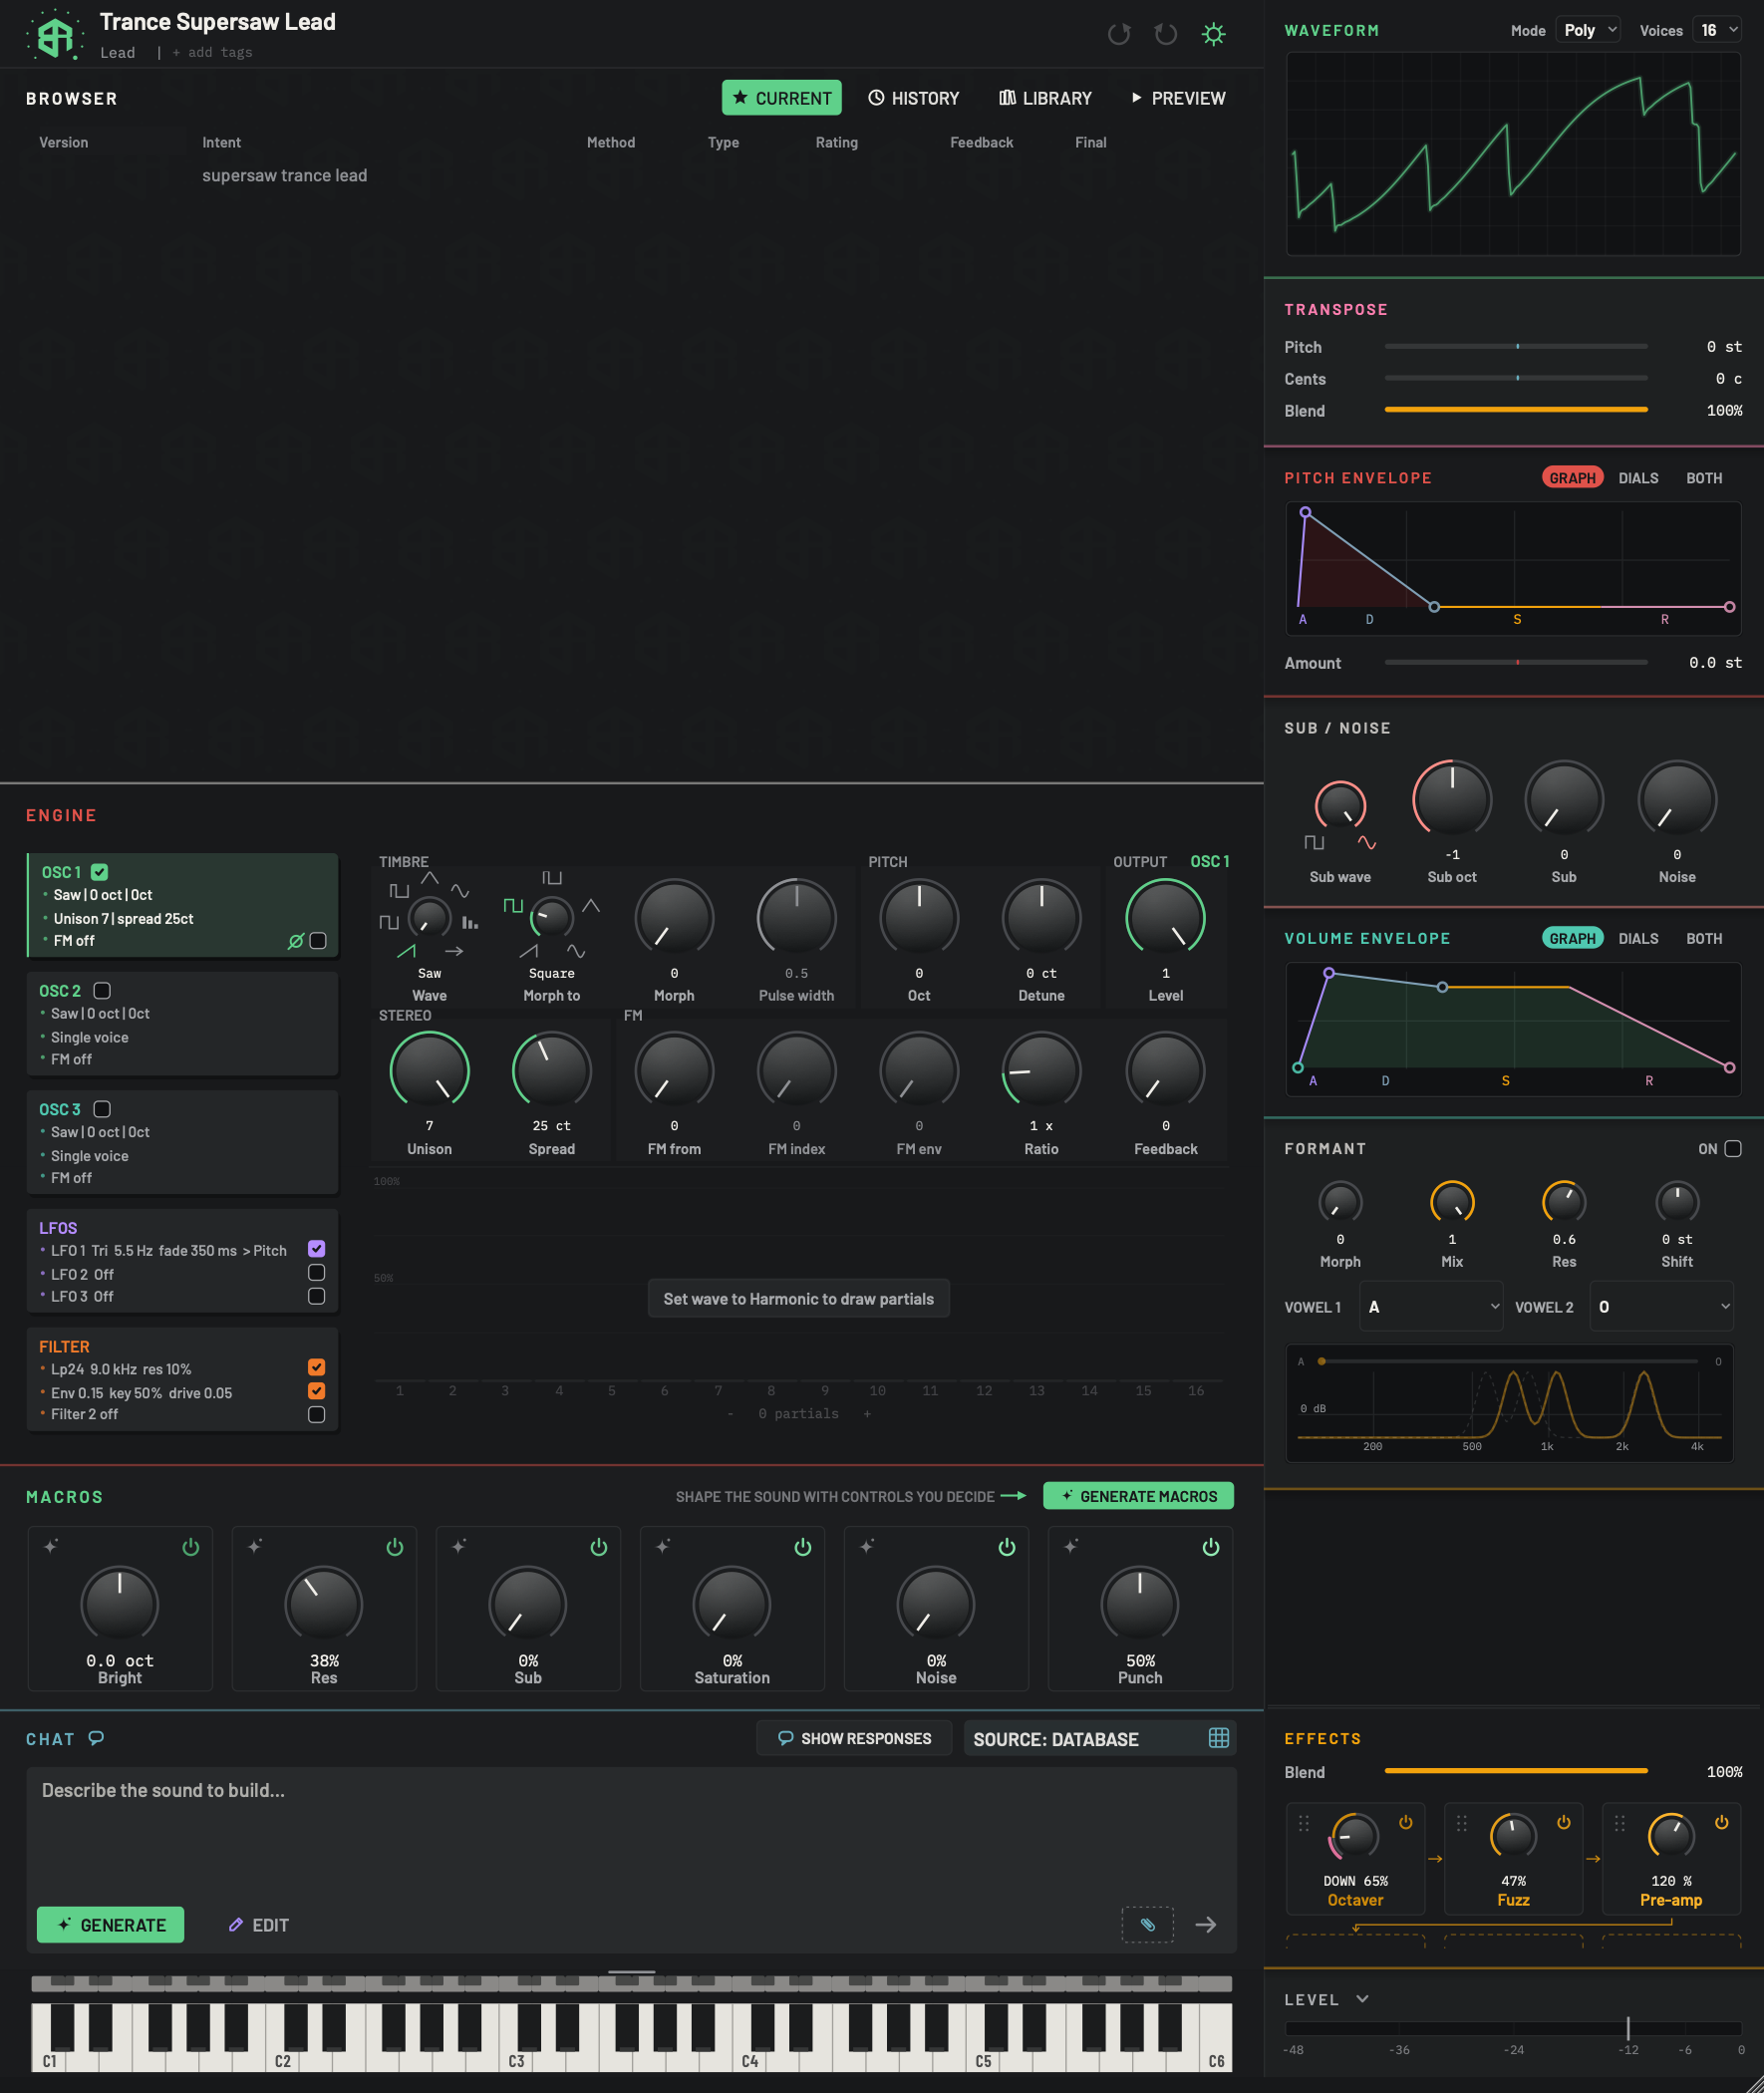
-
1Effects titleKey
Folds the block. See the empty block.
-
2BlendSlider
Mixes the whole chain with the plain synth. See Blend.
-
3GripKey
The six dots at the top left of a tile. Press on them, or on a part of the tile that is not the dial, and drag to move the tile to another slot. A bright line shows where it will land. Dropping it on another tile swaps the two. Dropping it on an empty slot moves it there. The order of the tiles is the order the sound goes through the effects.
-
4Power glyphSwitch
The power symbol at the top right of a tile. Click it to switch the effect off without losing its settings. A switched-off tile dims and its dial is disabled. The arrows stay as they are. Click again to switch it back on.
-
5Effect dialDial
The one main control of the effect. Drag it up or right to raise it. Double-click the dial to type a value.
Alt-click (Optionon a Mac) to reset it. HoldShiftwhile dragging for fine control. The other controls of the effect are in its detail panel, which opens when you double-click the tile away from its dial.More on dials in How dials, sliders and keys behave.
-
6ValueStatus
The current setting of the dial, in words and numbers that suit the effect, for example DOWN 65% on the Octaver.
-
7Effect nameStatus
The name of the effect, in the tile's own amber shade. Hover over the tile for a short description of what the effect does.
-
8Signal path arrowDisplay
Shows that the sound runs from this slot into the next one.
-
9Fuzz tileArea
A complete tile. Double-click it, away from the dial, to open the detail panel for the effect, and double-click it again to close the panel. Right-click it, away from the dial, for a menu with Remove fuzz and Generate this effect. A tile that has its detail panel open wears a ring.
Remove deletes the effect from the slot. Generate this effect switches the chat to Edit so you can describe a change to this one effect only.
-
10Pre-amp tileArea
The third tile in the chain. The sound goes through Octaver, then Fuzz, then Pre-amp.
-
11Bent arrowDisplay
The bent arrow carries the sound from the end of the first row to the start of the second row.
Each tile has five parts.
- The grip, six dots at the top left, moves the tile.
- The power glyph, at the top right, switches the effect on and off.
- The dial is the effect's main control.
- The value under the dial shows its setting.
- The name sits at the foot of the tile.
Hover over a tile for a one-line description of the effect. The dial moves like every dial: drag, double-click it to type a value, Alt-click (Option on a Mac) to reset, Shift while dragging for fine control. See How dials, sliders and keys behave.
Reorder
The order of the tiles is the order the sound goes through the effects, left to right and then down. Press on the grip, or on a part of the tile that is not the dial, and drag. A bright line marks where the tile will land. Drop it on another tile and the two swap places. Drop it on an empty slot and it moves there.
Switch off
Click the power glyph. The effect stops, but its settings are kept. The tile dims and its dial is disabled. The signal path arrows stay as they are. Click again to switch it back on.
Remove
Right-click a tile, on the tile and not on its dial. The menu has Remove followed by the effect's name, for example Remove bit crush, and Generate this effect. Remove takes the effect out of the chain and leaves an empty slot. Generate this effect switches the chat to Edit so you can describe a change to this one effect only.
The signal path arrows
Small amber arrows between the slots show the way the sound travels. A bent arrow carries it from the end of a row to the start of the next. The arrows are fixed in place and run slot to slot, whether a slot holds an effect or is empty, and whether the effect is on or off. When you reorder tiles, the sound follows the new order of the slots.
The order of the tiles is the order the sound goes through them, so moving a tile changes the sound.
-
1Drag a tile by its grip
Press on the six dots at the top left of a tile and drag it onto another tile. The two swap places. A bright line marks where the tile will land.
-
2Follow the arrows
The arrows run from slot to slot, so the sound follows the new order: left to right, then down to the next row.
-
3Switch a tile off
Click the power glyph. The tile dims and the effect stops, but its settings are kept. Click again to switch it back on.
-
4Remove a tile
Right-click the tile, away from its dial, and choose Remove fuzz. The slot becomes empty.
Open an effect's detail panel
The tile has one dial, but most effects have more. Double-click a tile, on the tile and not on its dial, to open its detail panel. A ring appears round the tile while its panel is open. (Double-clicking the dial types a value instead.)
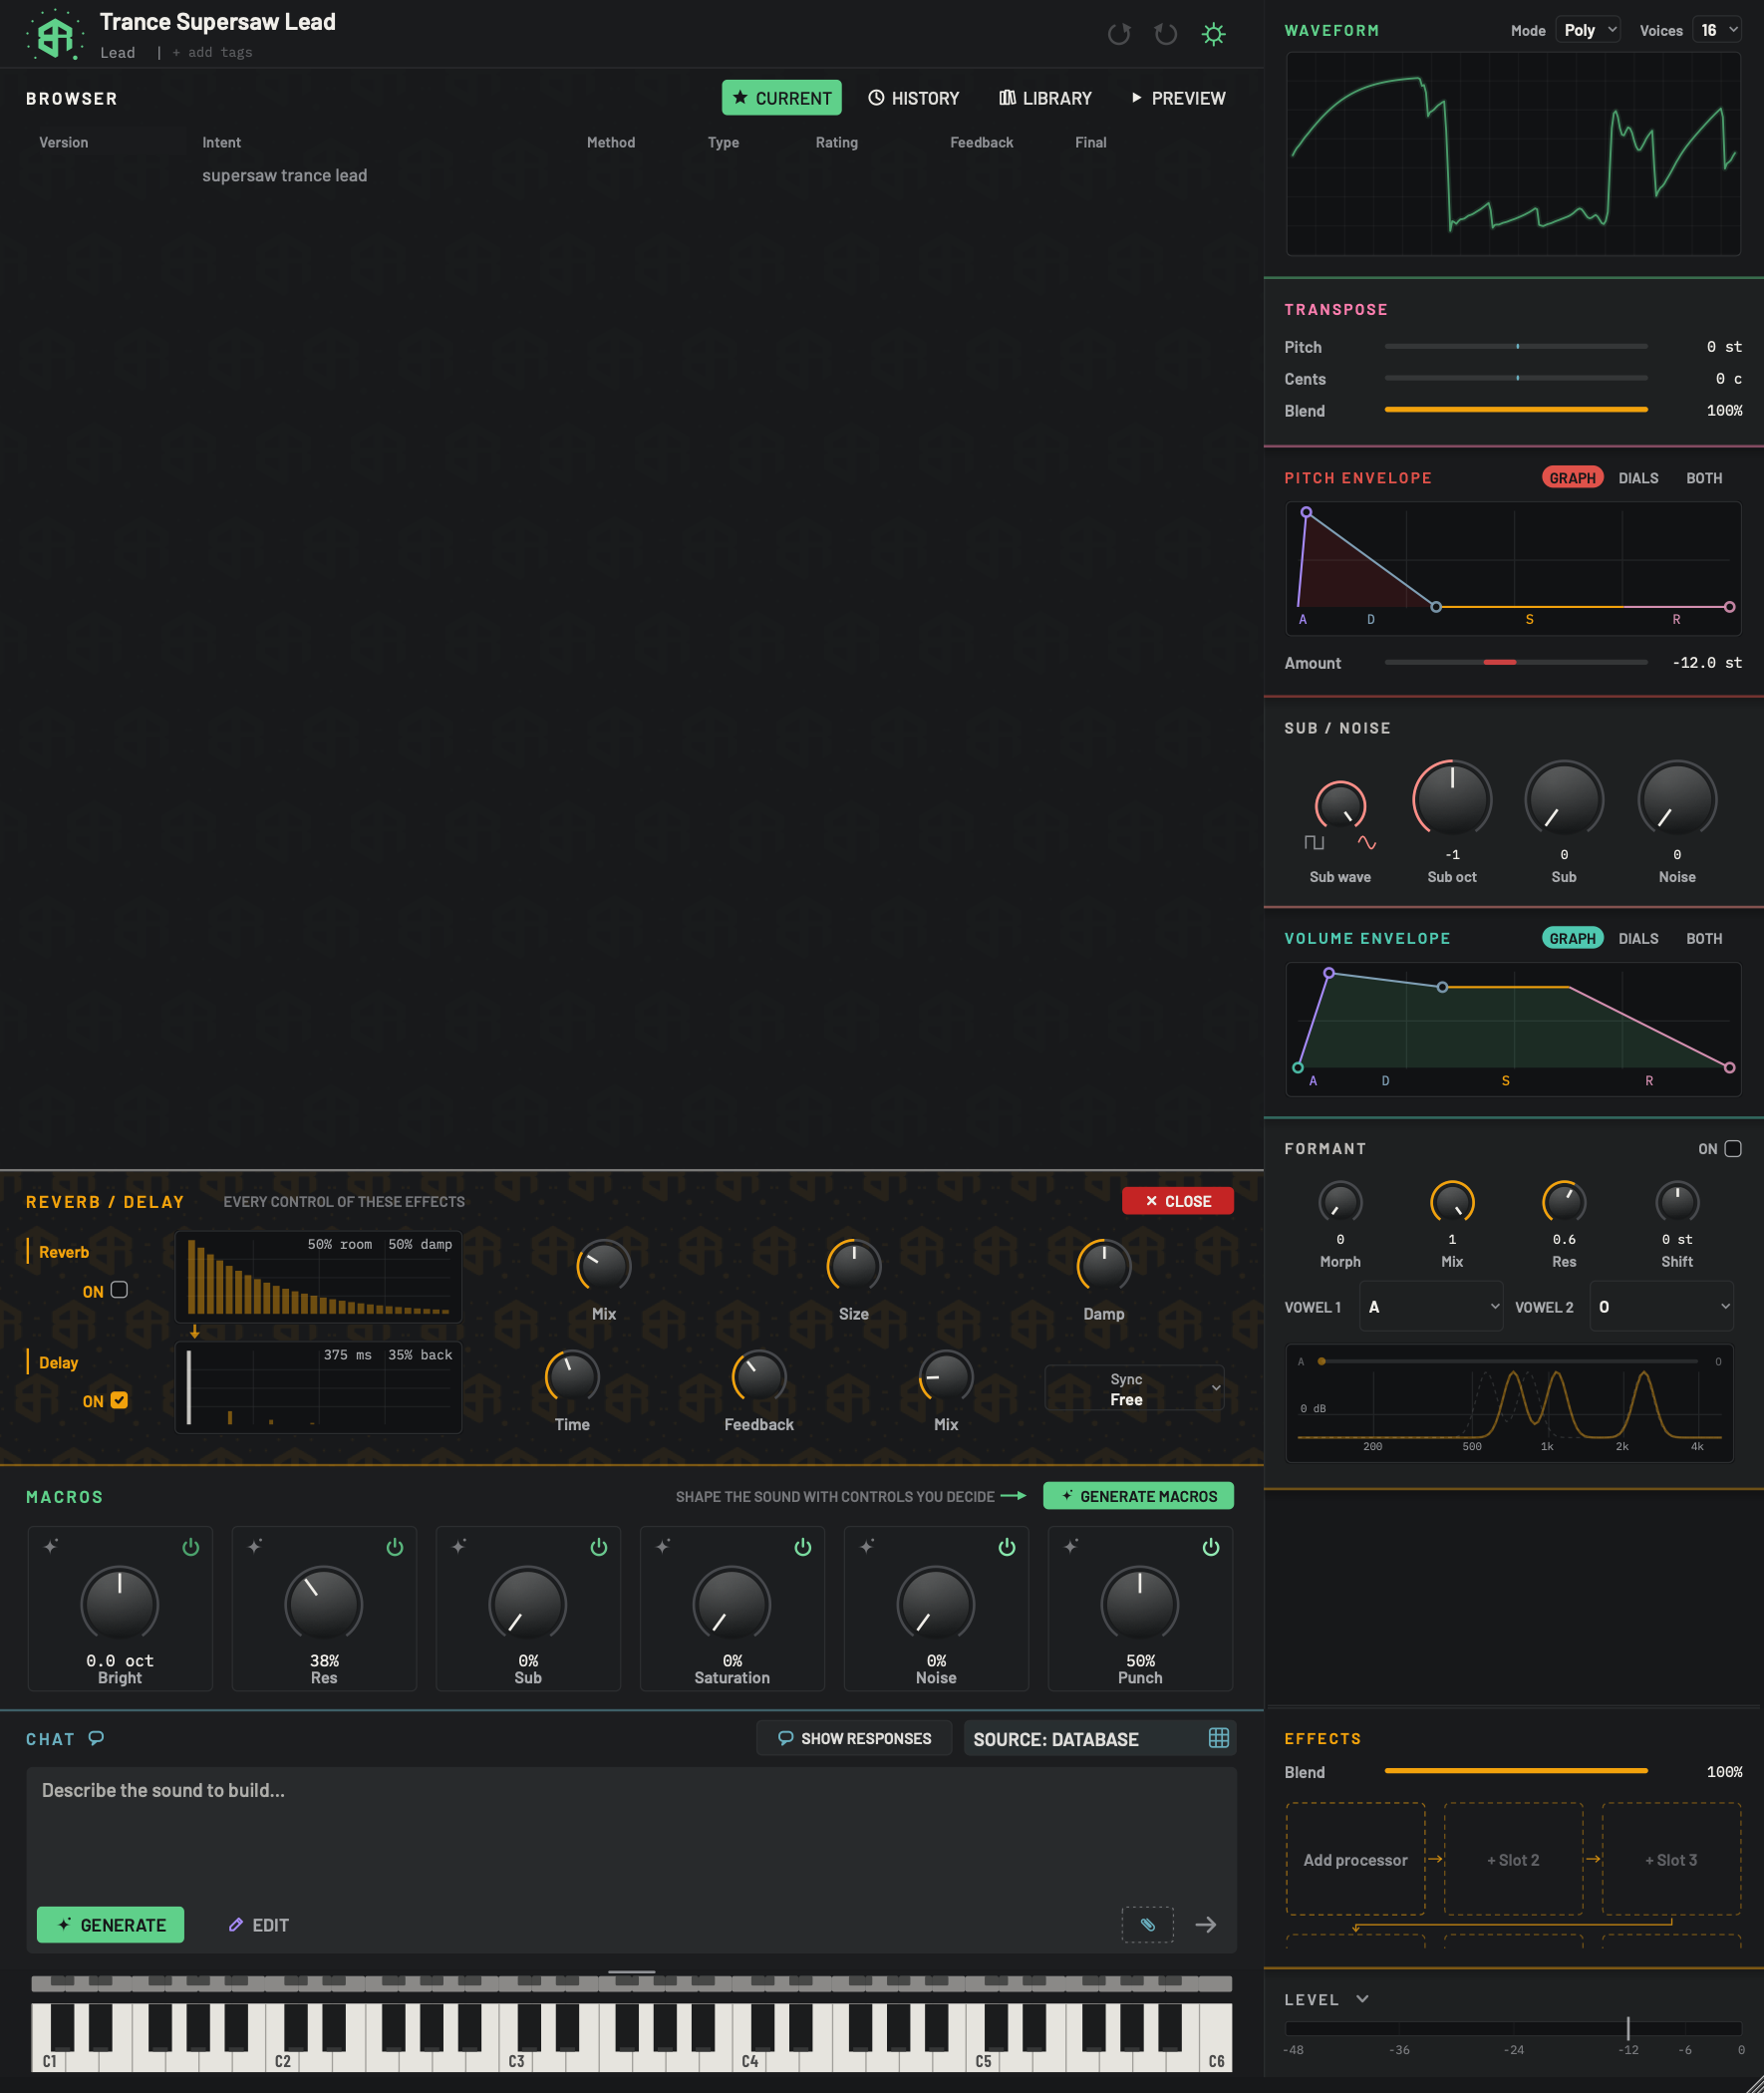
The detail panel opens in the centre column, above the macros. Only the panel is described here.
-
1Panel titleStatus
The names of the open effects, joined by a slash, for example REVERB / DELAY. With one effect open it shows that effect's name alone. The panel names a few effects differently from their tiles: OCTAVE for the Octaver, CRUSH for Bit crush and BR108 for Pre-amp.
-
2Every control of these effectsStatus
The words EVERY CONTROL OF THESE EFFECTS tell you the panel shows all the controls of the open effects, not just the one dial on each tile. With one effect open they read EVERY CONTROL OF THIS EFFECT.
-
3CloseKey
Closes the panel and returns to the engine.
Escor a click anywhere outside the panel does the same.Hover for the tip Back to the engine.
-
4Reverb card nameStatus
Each open effect has its own card. The card's name sits at its left with an amber bar. When several effects are open the cards stack in the order the sound goes through them, not in the order you opened them.
-
5Reverb onSwitch
Switches this effect on or off. It is the same switch as the power glyph on the effect's tile.
Hover for the tip This effect on or off.
-
6Reverb pictureDisplay
A picture of the effect drawn from its own settings, on a faint grid. It redraws as you turn the dials. For the reverb it shows a row of bars that die away, with the room size and damping written at the top right, for example 50% room 50% damp.
-
7Connector arrowDisplay
A small arrow between two cards. The sound runs down from one effect to the next.
-
8Reverb MixDial
How much reverb you hear against the plain sound. Each dial is labelled under it. They move like every dial: drag, double-click to type,
Alt-click to reset. -
9Reverb SizeDial
How big the room is. Small sizes are tight and short. Large sizes are long.
-
10Reverb DampDial
How quickly the highs die away inside the room. Higher values give a darker, softer tail.
-
11Delay card nameStatus
The second card, for the Delay.
-
12Delay onSwitch
Switches the delay on or off. A tick means on.
-
13Delay pictureDisplay
The dry sound as a tall line, followed by the echoes as shorter bars, with the time and the feedback written at the top right, for example 375 ms 35% back.
-
14Delay TimeDial
The gap between echoes. It is used when Sync is on Free.
-
15Delay FeedbackDial
How much of each echo feeds back into the next one. Higher values give more repeats.
-
16Delay MixDial
How much echo you hear against the plain sound.
-
17Delay SyncMenu
Click to lock the echo time to the tempo of the host, or leave it free. When it is locked, the Time dial no longer sets the gap.
- Options
Free, 1/1, 1/2, 1/4, 1/8, 1/16, 1/32, 1/4d, 1/8d, 1/16d, 1/4t, 1/8t, 1/16t. A d is a dotted note and a t is a triplet.
- Starts as
- Free
The panel opens in the centre column, in the place of the engine. Its title is the name of the effect, or the names of the open effects joined by a slash. The panel uses its own short names: OCTAVE for the Octaver, CRUSH for Bit crush and BR108 for Pre-amp. Beside it, the words EVERY CONTROL OF THIS EFFECT show for one effect, or EVERY CONTROL OF THESE EFFECTS for several. Close is at the right.
You can open several effects at once. Double-click each tile. The cards stack in the order the sound goes through them, not the order you opened them. Double-click an open tile again to close just that one.
Each card has the effect's name, an ON switch (the same as the tile's power glyph), a picture of the effect and its dials. The picture is drawn from the effect's own settings and redraws as you turn the dials. A small arrow between cards shows the sound running from one to the next.
The picture is different for each effect, and its caption sits in a top corner.
| Effect | What the picture shows |
|---|---|
| Compressor | The compression curve with a dot at the threshold, and a live bar that drops while the sound is turned down. The caption gives the threshold, the ratio and the amount of reduction. |
| Reverb | Bars that die away, with the room size and damping. |
| Delay | The dry sound, then each echo, with the time and the feedback. |
| Chorus, Flange, Phaser | A sine wave against a flat line, with the rate in Hz. |
| Bit crush | A stepped wave, with the bit depth and the hold. |
| Fuzz, Pre-amp | A curve that bends harder as the setting rises, with the fuzz or drive written on it. |
| Fold | The fold curve, with the fold amount. |
| Octaver | Two sine waves, with an octave up or an octave down. |
| OTT | Three bars for the low, middle and high bands, with the squash amount. |
| Formant | Three peaks, with three vowel peaks. |
To close the panel, click Close, press Esc, or click anywhere outside the panel.
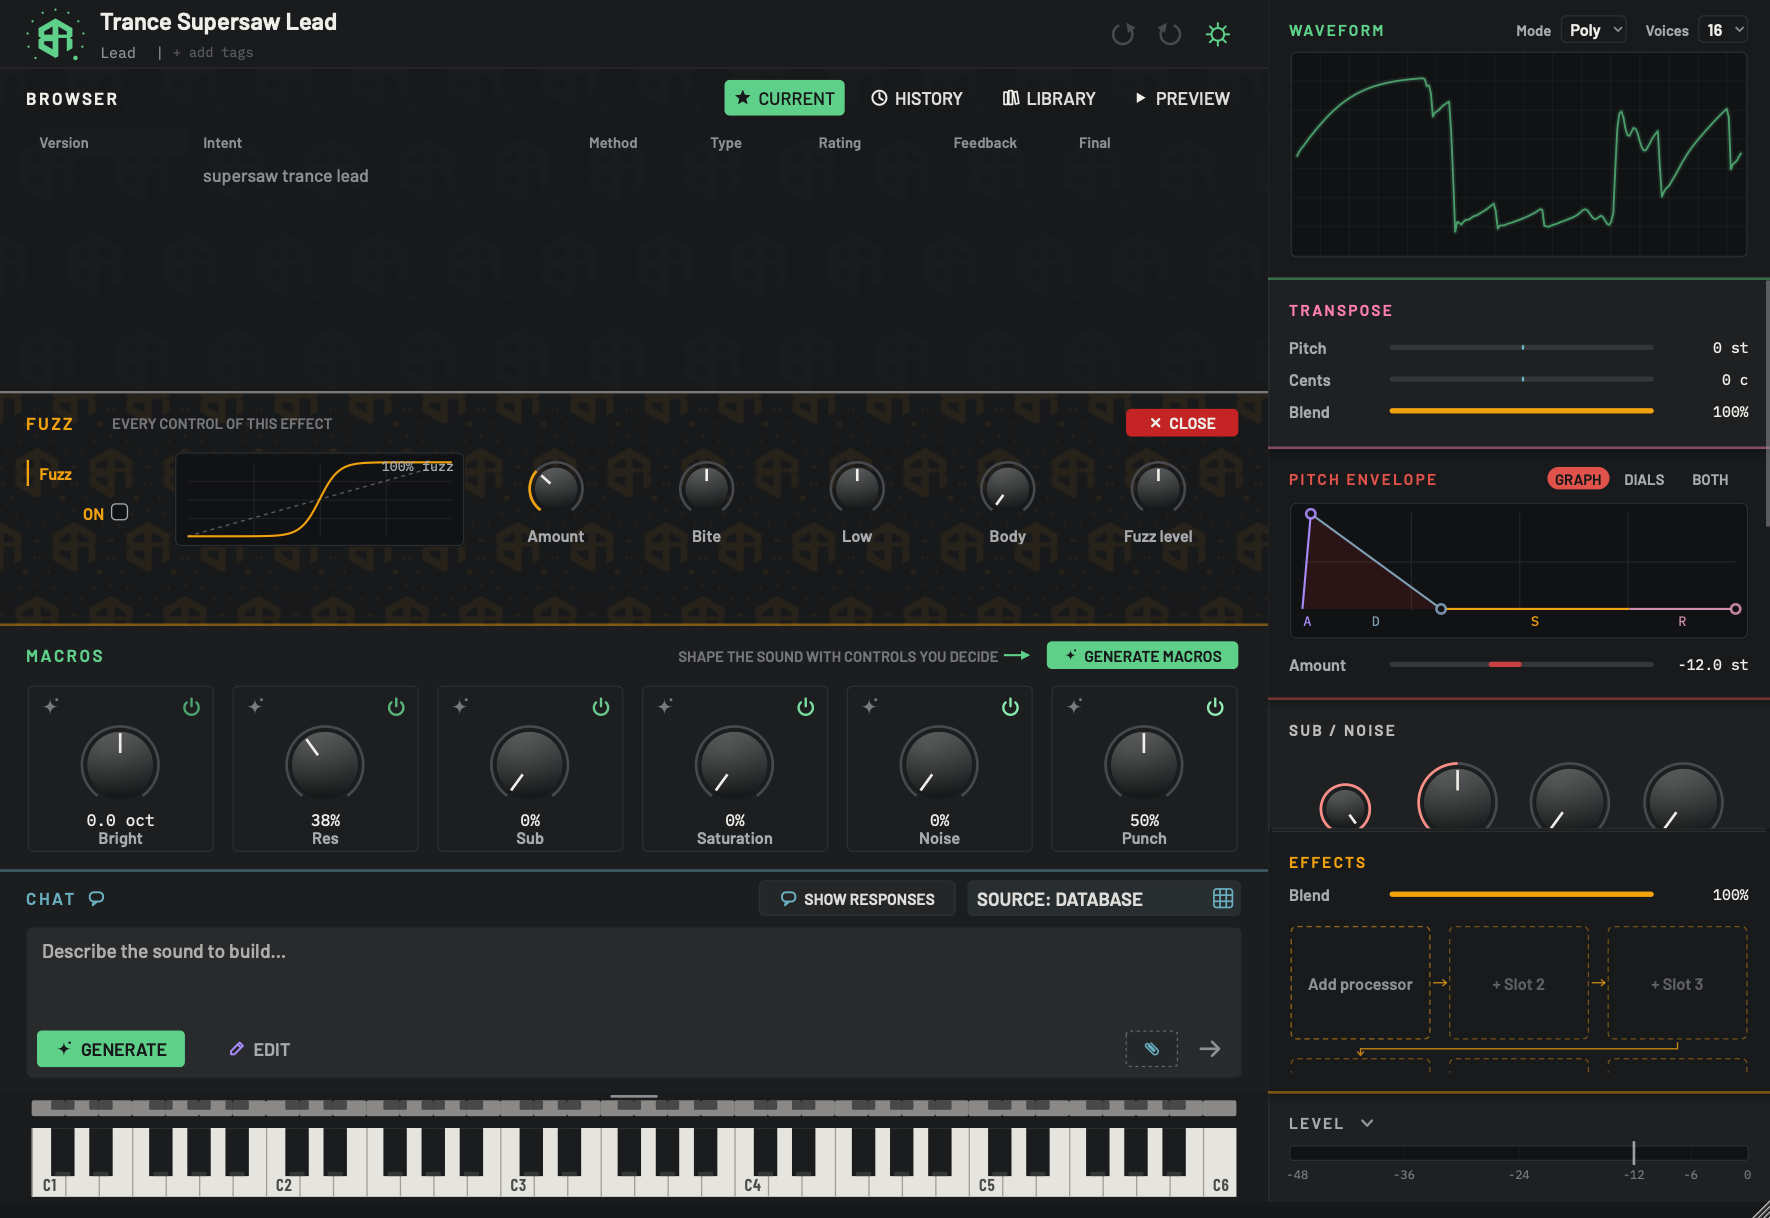
A panel with one effect open. The title, Close key, ON switch and picture work as described for the panel with two effects.
-
1Panel titleStatus
The name of the open effect.
-
2Every control of this effectStatus
The words EVERY CONTROL OF THIS EFFECT show when one effect is open.
-
3CloseKey
Closes the panel. See Close.
-
4Fuzz card nameStatus
The effect's card name.
-
5Fuzz onSwitch
Switches the fuzz on or off.
-
6Fuzz pictureDisplay
A curve that shows how the fuzz bends the sound: a gentle line that turns into a hard, flat-topped S as the fuzz rises. The amount is written at the top right, for example 100% fuzz.
-
7AmountDial
How hard the fuzz clips the sound. This is the dial on the tile.
- Options
0 to 3.
- Starts as
- 1
-
8BiteDial
Pushes the highs before the fuzz clips them. Positive values give a sharper edge. Negative values soften it.
- Options
-1 to 1.
- Starts as
- 0
-
9LowDial
Positive values blend clean low end back in. Negative values trim the deep lows.
- Options
-1 to 1.
- Starts as
- 0
-
10BodyDial
Adds weight to the low mids by saturating them.
- Options
0 to 4.
- Starts as
- 0
-
11Fuzz levelDial
The loudness of the fuzz output, so you can keep the volume steady as you push it.
- Options
-12 to +12 dB.
- Starts as
- 0 dB
Every effect has more controls than its tile shows. Open the panel to see them all.
-
1Double-click a tile
Double-click the Fuzz tile, away from its dial. A ring appears round the tile and the panel opens in the centre column.
-
2Read the picture
The picture shows what the effect does to the sound and redraws as you turn the dials.
-
3Turn a dial
Drag Bite. Each dial is named under it. Double-click a dial to type a value.
-
4Open a second effect
Double-click another tile. Both open, stacked in the order the sound travels, and the title joins their names.
-
5Close the panel
Click Close, press
Esc, or click outside the panel.
Two tiles have no panel: Drive and Analogue. Double-clicking them does nothing, because their only control is the tile's dial.
Every effect
Ranges and starting values below are those of the dials in the detail panel. The tile dial is marked.
Fuzz
A hard, fuzzy bass distortion. The picture is a curve that bends harder as the fuzz rises, with the amount written on it.
| Control | Range | Starts at | What it does |
|---|---|---|---|
| Amount (tile dial) | 0 to 3 | 1 | How hard the sound is clipped. |
| Bite | -1 to 1 | 0 | Pushes the highs before the clipping. Negative values soften it. |
| Low | -1 to 1 | 0 | Positive blends clean low end back in. Negative trims the deep lows. |
| Body | 0 to 4 | 0 | Adds weight to the low mids. |
| Fuzz level | -12 to +12 dB | 0 | The loudness of the fuzz output. |
Drive
Pushes the sound harder into the filter, for a thicker tone. It has one dial and no panel.
| Control | Range | Starts at |
|---|---|---|
| Drive (tile dial) | 0 to 1 | 0 |
A new Drive tile starts at 0.4. It is the same control as the Drive in the filter section of the engine.
Octaver
Adds a copy of the sound an octave below or above, blended in. The tile has one two-sided dial. Left of centre is an octave down. Right of centre is an octave up. The middle is dry. The value reads DRY, DOWN with a percentage, or UP with a percentage.
| Control | Range | Starts at | What it does |
|---|---|---|---|
| Octave, direction | Down, Up | Down | Which way the copy goes. |
| Octave, mix (tile dial) | -1 to 1 | 0 | How much of the copy you hear. Moving it across the middle changes the direction as well. |
Flange
A short, swept delay fed back on itself: the sound of a jet passing. Amount sets the depth, the feedback and the mix together.
| Control | Range | Starts at |
|---|---|---|
| Amount (tile dial) | 0 to 1 | 0.5 |
| Rate | 0.05 to 5 Hz | 0.3 Hz |
Phaser
Four swept stages working together: the classic phaser sweep.
| Control | Range | Starts at |
|---|---|---|
| Amount (tile dial) | 0 to 1 | 0.5 |
| Rate | 0.05 to 5 Hz | 0.5 Hz |
Pre-amp
The colour of a vintage pre-amp channel, with a three-band tone control, warmth and drive. It is separate from Analogue.
| Control | Range | Starts at | What it does |
|---|---|---|---|
| Channel | 1 to 20 | 1 | Which of the twenty channel characters you hear. |
| Colour (tile dial) | 0 to 200% | 100% | How much of the channel's own character. |
| Warmth | 0 to 100 | 0 | A gentle tilt of the tone. |
| Lo | -16 to +16 dB | 0 | Level of the low band. |
| Mid | -16 to +16 dB | 0 | Level of the middle band. |
| Mid Hz | 350, 700, 1.6K, 3.2K, 4.8K, 7.2K | 1.6K | The centre of the middle band. |
| Hi | -16 to +16 dB | 0 | Level of the high band. |
| Drive | 0 to 100% | 0 | How hard the channel is driven. |
Bit crush
Fewer bits and fewer samples, for a lo-fi grain. The picture is a stepped wave with the bit depth written on it.
| Control | Range | Starts at |
|---|---|---|
| Bits (tile dial) | 2 to 16 | 8 |
| Rate | 1 to 40 times | 4 times |
Rate is how many samples are held for the same value, so a higher number sounds coarser.
Formant
Puts the sound through vowel shapes. It is the same effect as the Formant block, with the same controls and the same on switch.
| Control | Range | Starts at |
|---|---|---|
| Vowel 1 | A, E, I, O, U, Ä, Ö, Ü, Å, Oo, Uh | A |
| Vowel 2 | the same list | O |
| Morph (tile dial) | 0 to 1 | 0 |
| Mix | 0 to 1 | 1 |
| Res | 0 to 1 | 0.6 |
| Shift | -12 to +12 semitones | 0 |
Compressor
Glues the sound together by turning down the loud parts. One dial does most of the work. It ties the threshold and the ratio together, and the makeup gain is automatic. Higher settings squash harder. The picture shows the compression curve and a live bar that drops when the sound is being turned down.
| Control | Range | Starts at |
|---|---|---|
| Amount (tile dial) | 0 to 1 | 0.3 |
| Attack | 0.1 to 200 ms | 5 ms |
| Release | 5 to 2000 ms | 120 ms |
Chorus
Width and shimmer, from a slowly moving copy of the sound.
| Control | Range | Starts at |
|---|---|---|
| Rate | 0.05 to 8 Hz | 0.8 Hz |
| Depth | 0.2 to 12 ms | 3 ms |
| Mix (tile dial) | 0 to 1 | 0.4 |
Delay
Echoes with feedback. The picture shows the dry sound and each echo, with the time and the feedback written on it.
| Control | Range | Starts at | What it does |
|---|---|---|---|
| Time | 10 to 2000 ms | 380 ms | The gap between echoes, when Sync is Free. |
| Feedback | 0 to 0.95 | 0.35 | How much of each echo feeds the next. |
| Mix (tile dial) | 0 to 1 | 0.2 | How much echo you hear. |
| Sync | Free, 1/1, 1/2, 1/4, 1/8, 1/16, 1/32, 1/4d, 1/8d, 1/16d, 1/4t, 1/8t, 1/16t | Free | Locks the echo time to the tempo of the host. A d is a dotted note and a t is a triplet. |
Reverb
A small room or hall after everything else. The picture shows bars that die away, with the size and damping written on it.
| Control | Range | Starts at | What it does |
|---|---|---|---|
| Mix (tile dial) | 0 to 1 | 0.3 | How much reverb you hear. |
| Size | 0 to 1 | 0.5 | How big the room is. |
| Damp | 0 to 1 | 0.5 | How quickly the highs die away. |
Analogue
A vintage pre-amp voice that the whole sound goes through, with sparkle that rises with the amount. It sits at the start of the signal path and has one dial and no panel.
| Control | Range | Starts at |
|---|---|---|
| Analogue (tile dial) | 0 to 6 | 0, which is off |
Turn the dial and you walk through six voices, from the gentlest to the most intense: Big 02, Bright 02, Bright 01, Big 01, Outlier 02 and Outlier 01. The whole number picks the voice and the part after the point is how much of it you hear. The value reads for example Big 02 35%. A new Analogue tile starts on Big 02 at 35%, and removing it sets the amount back to zero.
OTT
The add menu and the tile write this name as Ott. Three-band compression that pulls both loud and quiet parts toward the middle. At full depth it is hyper-bright. At zero depth the sound is untouched.
| Control | Range | Starts at | What it does |
|---|---|---|---|
| Depth (tile dial) | 0 to 1 | 0.5 | How hard the three bands are squashed. |
| Time | 0 to 1 | 0.5 | How quickly the three bands react. At 0 their attack and release times are halved, at 1 they are doubled, and 0.5 is the normal speed. |
Fold
A wavefolder. Instead of clipping, the sound folds back on itself, which adds a metallic layer. The loudness stays level while the tone changes.
| Control | Range | Starts at | What it does |
|---|---|---|---|
| Amount (tile dial) | 0 to 1 | 0.4 | How far the sound folds. At 0 the sound is untouched. |
| Shape | 0 to 1 | 0 | From a smooth fold at 0 to a sharper, triangular fold at 1. |